Monday, December 10, 2012

TFTP


Trivial File Transfer Protocol (TFTP) is a file transfer protocol notable for its simplicity. It is generally used for automated transfer of configuration or boot files between machines in a local environment. Compared to FTP, TFTP is extremely limited, providing no authentication, and is rarely used interactively by a user.
Due to its simple design, TFTP could be implemented using a very small amount of memory.. It is therefore useful for booting computers such as routers which may not have any data storage dive. It is an element of the Preboot Execution Environment (PXE) network boot protocol, where it is implemented in the firmware ROM / NVRAM of the host's network card.

It is also used to transfer small amounts of data between hosts on a network, such as IP phone firmware or operating system images when a remote X Windows system terminal or any other thin client boots from a network host or server. The initial stages of some network based installation systems (such as Solaris Jumpstart, Red Hat Kickstart, Symantec Ghost and Windows NT's Remote Installation Services) use TFTP to load a basic kernal that performs the actual installation. It was used for saving router configurations on Cisco routers, but was later augmented by other protocols.


TFTP was first defined in 1980 by IEN 133. It is currently defined by RFC 1350. There have been some extensions to the TFTP protocol documented in later RFCs.. TFTP is based in part on the earlier protocol EFTP, which was part of the PUP protocol suite. TFTP support appeared first as part of 4.3 BSD.
Due to the lack of security, it is dangerous to use it over the Internet. Thus, TFTP is generally only used on private, local networks.

Note If a TFTP server is not available on your Linux distribution or installed system, you can obtain a binary version for most Linux distributions from http://www.rpmfind.net/linux/rpm2html/ by searching for the string tftpd.
Ubuntu and Debian users can install the TFTP server with the following command:

# apt-get install xinetd tftpd
 
Before configuring the TFTP daemon itself, make sure that the entries for the TFTP protocol are not commented out in the /etc/services file. This file is typically consulted by each network service in order to determine the network ports that it should use.
You must be the root user to edit this file. Use your favorite text editor to remove the comment character (#) from the beginning of each line that contains the string tftp. Active TFTP entries in /etc/services should look like the following:

tftp            69/tcp
tftp            69/udp
 
Depending on the desktop Linux distribution and version you are using, Linux systems typically use one of two mechanisms to activate and manage network servers such as TFTP servers. These are either the Internet Services Daemon (inetd) or, more commonly, the Extended Internet Services Daemon (xinetd). Both of these commands manage a variety of network services by monitoring various network ports and starting the appropriate daemon in response to a valid request. The more modern mechanism is xinetd, and it is generally viewed as being more secure than the older inetd.
To determine which of these mechanisms your system uses to manage Internet services, you can use the system’s ps (process status) command, as in the following example:

# ps -alxww | grep inet
140      0    578      1   0  0  1152  356  do_select  S  ?  0:00  xinetd  ...
  0    500  13361  13336  18  0  1360  508  pipe_read  S  ?  0:00  grep -i  inet
 
In this example, the system is using the xinetd server, and you should follow the instructions in Configuring a TFTP Server Run by xinetd. If the output from this command shows that your system is running the inetd server, proceed to Configuring a TFTP Server Run by inetd.

Configuring a TFTP Server Run by xinetd

The servers that can be managed by the xinetd daemon are each listed in a server-specific configuration file located in the directory /etc/xinetd.d. The file for the TFTP server is named tftp, and looks like the following:

# default: off
# description: The tftp server serves files using the Trivial File Transfer \
#    Protocol.  The tftp protocol is often used to boot diskless \
#    workstations, download configuration files to network-aware printers, \
#    and to start the installation process for some operating systems.
service tftp
{
    socket_type     = dgram
    protocol        = udp
    wait            = yes
    user            = root
    server          = /usr/sbin/in.tftpd
    server_args     = -s /tftpboot
    disable         = yes
}
 
To enable the TFTP server, edit this file as the root user, replacing the word yes on the disable line with the word no. Then save the file and exit the editor.
Next, restart the xinetd process to force it to reread its configuration files, as described in Restarting the Service

Restarting the Service

If your system is running a desktop Linux distribution such as Red Hat Linux, which starts and stops system processes by using run configuration (rc) scripts, you can simply restart the daemon by invoking these scripts in one of the following commands that is appropriate for your daemon:

# /etc/init.d/xinetd restart
# /etc/init.d/inetd restart
 
This command will stop and then restart all of the services managed by the daemon on your Linux system. In addition to the restart command, you can also issue stop and start commands this way.
Caution
If your Linux system is running Internet services on which other systems depend, restarting the daemon will cause a slight interruption in those services.
After executing this command, the TFTP server will be started on your system in response to incoming TFTP requests, and you can access any files you copied to /tftpboot.
Note  If you need another way to stop the process, the following method will work on any Linux distribution. Send the HUP signal to the running xinetd process. To do this, you must first determine the process ID of the process that is currently running on your system by using the ps process status command, as in the following example:

# ps -alxww | grep xinet
 140    0    578      1   0  0  1152     356  do_select  S  ?  0:00  xinetd 
   0  500  13361  13336  18  0  1360     508  pipe_read  S  ?  0:00  grep -i  xinet
 
Of course, substitute inetd if that is the service you are using.
The -alxww options to the ps command cause it to display all system processes in an extremely wide listing. The grep command then searches for the string xinet in the resulting listing. This example displays information about a running command whose name or arguments contain the string xinet. Of these, the first is the actual xinetd process, and the third field is its process ID (in this example, 578). The process ID is the information that you will need to restart the process.
After collecting this information, you can cause the xinetd process to reread its configuration file by executing a command like the following:
 
# kill -HUP 578

Testing the Service

To ensure the TFTP server is running place a small text file in /tftpboot:
 
# echo "Hello, embedded world" > /tftpboot/hello.txt"

Then execute the following commands:
 # tftp localhost
tftp> get hello.txt
Received 23 bytes in 0.1 seconds
tftp> quit 

Thursday, December 6, 2012

Apache Web Server


 We were disscussed about Desktop Secuirty. before we going start attacking or security related discussion topic.Lets Discuss about protocol working in backtrack which are helpful for attack and finding loopholes in websites or system. What is apache server? and what is use main use of Apache server? and How to install this sever? we will see now ......

The Apache HTTP Server, is a web server  software notable for playing a key role in the initial growth of the World Wide Web.In 2009 it became the first web server software to surpass the 100 million website milestone. Apache was the first viable alternative to the Netscape Communications Corporation web server (currently named Oracle_iPlanet_Web_Server), and since has evolved to dominate other web servers in terms of functionality and performance.Typically Apache is run on a Unix like operating system, and was developed for use on Linux.


INTRODUCTION TO APACHE
Apache is a http web server maintained by a opensource community called Apache Software Foundations. It runs on port 80 which is the default port number of HTTP (Hyper Text Transfer Protocol).
INSTALING APACHE
It can be installed using apt-get process or from package manager
sudo apt-get install apache2
STARTING APACHE
It can be started either from terminal or from GUI
Starting from Terminal:-
Step 1: Open terminal
Step 2: Enter the following command
apache2ctl start
Starting from GUI ;-
click applications/backtrack/services/HTTPD/apache start
This location may vary from one operating system to another.
Any one of this procedure starts the apache server
TESTING APACHE
This can be testad by using netstat command
netstat -ant |grep 80
If it shows some output  like  this this means apache server is running on your system
INTRODUCTION TO APACHE
Apache is a http web server maintained by a opensource community called Apache Software Foundations. It runs on port 80 which is the default port number of HTTP (Hyper Text Transfer Protocol).
INSTALING APACHE
It can be installed using apt-get process or from package manager
sudo apt-get install apache2
STARTING APACHE
It can be started either from terminal or from GUI
Starting from Terminal:-
Step 1: Open terminal
Step 2: Enter the following command
apache2ctl start
Starting from GUI ;-
click applications/backtrack/services/HTTPD/apache start
This location may vary from one operating system to another.
Any one of this procedure starts the apache server
TESTING APACHE
This can be testad by using netstat command
netstat -ant |grep 80
If it shows some output  like  this this means apache server is running on your system

It means an application(HTTP) server using tcp protocol whose port number is 80 is running on your local host  and is in listenning state.

USING APACHE
Once the server is started every one in local network can access it using browser.
Steps to access server from local browser
Step 1: Every client should know server ip address. It can be found by typing ifconfig on server machine. I am skipping details of ipconfig and interfaces in this article.
ifconfig
Step 2: Enter the address of server on browser
For Example: If local server is on ip address "192.168.1.100" then type "http://192.168.1.100" it shows the default web page

SETTING UP WEB PAGES
Default web page for apache is "index .html" at location /var/www. If u go to the location /var/www an index.html file will be present at this location. This is the folder where u need to place your web content.
Designing HTML is not explained in this article. Once you have your html page it has to be renamed as index.html and pass it in same location "/var/www".
APACHE USAGE COMMANDS
Apache help can be obtained by
apache2ctl -h
It displays all the commands and their usage.
Apache software version can be obtained by
apache2 -v
RESTARTING APACHE
Apache can be restarted by typing the command
apache2ctl restart
CLOSING APACHE
To close apache type the command "apache2ctl stop" on terminal
apache2ctl stop
Try to test it again with netcat as explained above in TESTING APACHE it should show nothing
CONCLUSION
Every thing explained above is with respect to Backtrack 5. It should also work with ubuntu only the GUI, locations may vary .
Version showed in this article is Apache/2.2.14 (Ubuntu).
All the information is use for knowledge purpose. don't miss use it.If any kind of misuse happen then your the only person who is responsible.

Saturday, September 8, 2012

Remove syskey password usning HIREN bootable cd


Last post we had seen the syskey disable method without using any software. but what about when user don't know(forgot) syskey password. may be user forgot syskey password.don't be panic.whether he/she forget his syskey password. finale option is bootable cd for disable syskey passoword. In this internet word yuo will get anything from any website.i will tell you some important software.
OPH crack live CD 

Hiren CD
Admin Hack.
Active password changer
Offline password changer

these are few software by which we can disable or crack windows xp/ 7 / vista / NT / sever 2003 etc .
here we go ........................... 
     
     You can write this image with any image burning software. We are using this traditional software Nero. 
      Now go to the system and boot form this CD

                                                    Enter  on Boot option

                                This window bootable Linux scripts will search your entire hard disk and 
                                show all the available partitionson hard disk.
       
                                                                         Press Enter

                                                      Press 1 and than Enter


                                                                Press Enter
 
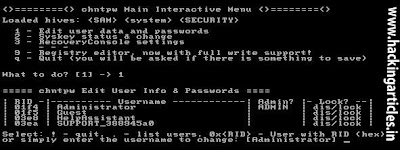
                                Press 1 ( To reset the Password ) and than Enter

                                Press 2  To change the syskey status and then Enter


                                 Press y and then Enter
                                 Now, your syskey password will get removed
  
               Now we will reset windows administrator password

 How to Break Syskey Password Windows 7 and Server 2008 
                               Press 1 ( Edit user data & password) and then Enter
                              Type Administrator and then Enter
                                Press 1 To clear the password and then Enter
                                Press   !  sign and enter to come back on pervious menu.
                                Press  Q  (  For quit) and then Enter
                                Press y  To save the changes made so far and then Enter
                                Press N(For no more changes) and then Enter
                                Now press ALT + CTRL + DEL to restart the system

now enjoy with ur system:)

Warning !
Don't use this thing for hacking .. this tutorial is only for knowledge purpose ..!


Friday, August 3, 2012

TO REMOVE STARTUP PASSOWRD

As wee can see USING SYSKEY UTILITY on may 15 2012.
But what about disability? How we can disable syskey? we can use HIREN Soft to disable the syskey. But when we use hiren  software for disable syskey then system drivers will be lost.
so today im gonna telling u another way to disable the syskey utility password in a easy way.
Let's see this :)


TO REMOVE STARTUP PASSOWRD

 1) Select the System Generated Password, select the Store Startup Key Locally option, and click/tap on OK. (see screenshot below)


2) Enter the startup password ( as we seen post may 15,2012 ) And click/tap on ok (see screenshot below)


3) Click/Tap on ok 


Windows will now no longer require users to enter the startup password at every system startup.   
That's It 

Caution This tutorial is Education purpose only . do not misuse this knowledge 


Thursday, July 19, 2012

How to steal data from an E-mail


  •       Social Engineering.
  •   Exploiting the vulnerabilities in security.
  •   Keyloggers and browser monitoring.
Social Engineering
Social engineering is a collection of techniques used to manipulate people into performing action or divulging information. While similer to a confidence tricks or simple fraude, the term typically applies to trickey for information gathering or computer system access and in most cases the attacker never comes face-to-face with the victim.
Social engineering is considered a revolutionary art amoung the hacker community, it has proven to be an intresting tool that can be exploited by anyone. All social engineering attackes are based on flaws in human as congnitive biases.Some of these attackes are :
  •  Pretexting.
  •  Phishing.
  •  IVR/Phone Phishing.
  •  Trojan horse.
  •  Road apple

Security Vulnerability
Vulnerabilities are seccurity flaws or holes through which hackers can infiltrate.these holes can provide the hacker access to mailbox even the permission of the user.sometimes the administrator is negligent in patching the vulnerability in security. The hacker makes use of the vulnerability at this point and steals confidential data without the consent of the user.

Keyloggers
A keyloggers is a type os survellance software or spyware that has the capability to record every keystroke you make to a log file,usually encrypted. A keyllogers recoreder can record instant messages,e-mail and any information you type at any time using your keyboard.The log file created by the key loggers can then be sent specified receiver.

Saturday, July 14, 2012

How to hide a folder which no can find even it will not show during searching

Make a new folder in D drive and name it whatever u want i am giving name fans of hackers
so..........
go to RUN then type CMD hit enter now a DOS Window will open type there

" attrib +s +h D:/filename " without the quots

now hit enter now go into ur D drive there u will see that ur folder is hidden now try all the way to find it like TOOL menu SEARCHING etc.......
it will never show without using this method to get it back open CMD again and type

"attrib -s -h D:/filename " without the quots

now u will get it back enjoy and save ur data where ever u want

u can also select any drive so just change the directory. :)

Friday, June 29, 2012

Uninstall Backtrack 5 Dual Boot Win 7


it’s not uninstall actually, hha just simply delete it.
after a month i tried to use backtrack 5, i found out that my disk space allocated for backtrack 5 was nearly empty, 10 GB was too small. So i’d like to add new disk space, but i haven’t found the way to do it. I came up with uncool steps.
1. Remove old backtrack installation
2. Reinstall backtrack with new disk space allocation
to remove backtrack installation, which is dual booted with windows 7, i have to make sure my windows 7 can still work well. after googling, i got the message to do fixmbr to recover windows 7 boot manager. so here are the steps.
A. Fixing windows 7 boot manager
1. prepare your win7 installation disk (dvd/usb), plug it in.
2. start your computer, set the boot priority from bios setting (first boot usb, or cd/dvd room)
3. when windows 7 installation comes up, choose repair
4. choose repair this computer with recovery tool, click next
5. choose command prompt
6. enter this command
[php]bootRec.exe /fixmbr[/php]
7. reboot your computer
B. Remove backtrack
1. now your computer should start the win 7 automatically
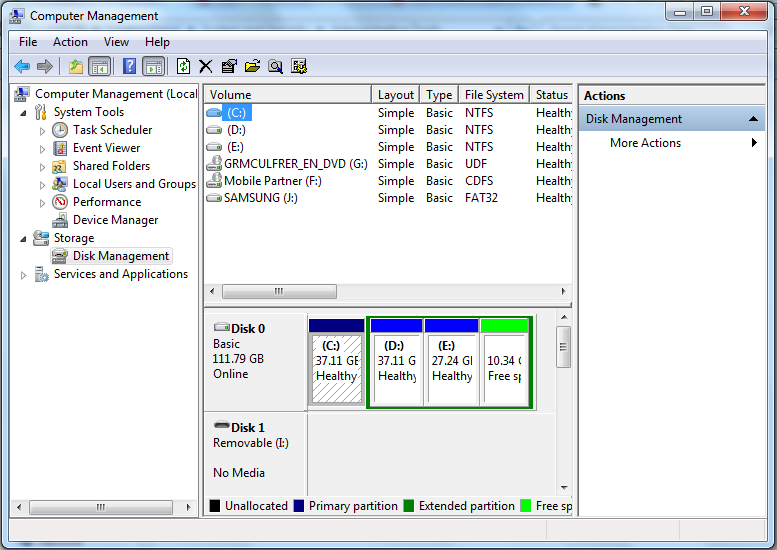
2. go to control panel > System and Security > Administrative Tools > Computer Management > choose Disk Management (under storage properties)
3. u will see clearly your computer partitions, delete your backtrack partition by right click > delete Volume
4. after it is deleted you will have new disk space and u can expand your other windows partition.
partition manager
computer management windows 7